The Share Workbook Button Is on the ______ Tab of the Ribbon 1 Data 2 Review 3 Edit 4 File
To prevent other users from accidentally or deliberately irresolute, moving, or deleting data in a worksheet, you lot can lock the cells on your Excel worksheet and then protect the sheet with a password. Say you own the team status report worksheet, where yous want team members to add data in specific cells only and not exist able to alter anything else. With worksheet protection, you lot tin make only certain parts of the canvass editable and users will not be able to modify information in any other region in the sheet.
Important:Worksheet level protection is not intended as a security characteristic. It just prevents users from modifying locked cells within the worksheet. Protecting a worksheet is non the same as protecting an Excel file or a workbook with a password. Come across beneath for more information:
-
To lock your file so that other users can't open it, see Protect an Excel file.
-
To prevent users from adding, modifying, moving, copying, or hiding/unhiding sheets within a workbook, come across Protect a workbook.
-
To know the difference between protecting your Excel file, workbook, or a worksheet run across Protection and security in Excel.
The following sections describe how to protect and unprotect a worksheet in Excel for Windows.
Here's what you can lock in an unprotected canvas:
-
Formulas: If you lot don't desire other users to run across your formulas, y'all can hide them from being seen in cells or the Formula bar. For more than information, meet Display or hibernate formulas.
-
Ranges: You can enable users to work in specific ranges within a protected sheet. For more information, see Lock or unlock specific areas of a protected worksheet.
Annotation:ActiveX controls, form controls, shapes, charts, SmartArt, Sparklines, Slicers, Timelines, to name a few, are already locked when you add them to a spreadsheet. Merely the lock volition work only when you enable sheet protection. See the subsequent department for more data on how to enable sheet protection.
Worksheet protection is a two-step process: the first footstep is to unlock cells that others can edit, and so you can protect the worksheet with or without a password.
Step i: Unlock whatever cells that needs to exist editable
-
In your Excel file, select the worksheet tab that you want to protect.
-
Select the cells that others can edit.
Tip:You can select multiple, not-contiguous cells past pressing Ctrl+Left-Click.
-
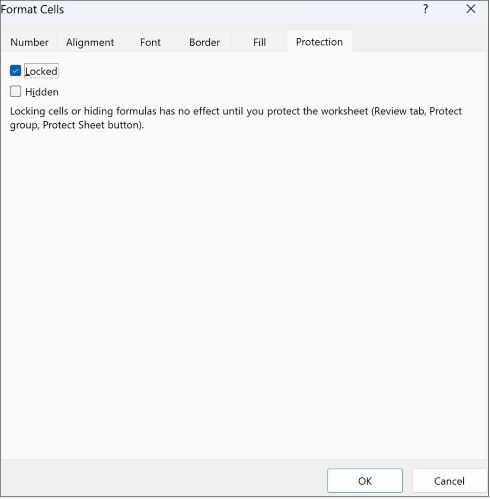
Right-click anywhere in the sheet and select Format Cells (or use Ctrl+1, or Command+one on the Mac), and and then go to the Protection tab and articulate Locked.
Step 2: Protect the worksheet
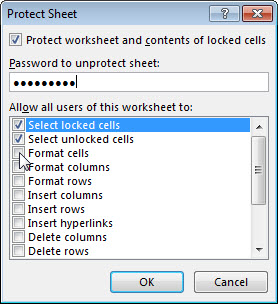
Next, select the actions that users should exist immune to take on the sheet, such equally insert or delete columns or rows, edit objects, sort, or utilise AutoFilter, to name a few. Additionally, you lot tin can also specify a password to lock your worksheet. A password prevents other people from removing the worksheet protection—information technology needs to be entered to unprotect the canvas.
Given beneath are the steps to protect your sheet.
-
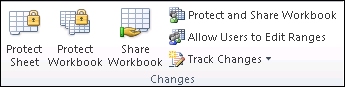
On the Review tab, click Protect Sheet.
-
In the Allow all users of this worksheet to list, select the elements you lot desire people to be able to alter.
Option
Allows users to
Select locked cells
Move the pointer to cells for which the Locked box is checked on the Protection tab of the Format Cells dialog box. By default, users are allowed to select locked cells.
Select unlocked cells
Move the pointer to cells for which the Locked box is unchecked on the Protection tab of the Format Cells dialog box. Past default, users can select unlocked cells, and they can press the TAB key to move between the unlocked cells on a protected worksheet.
Format cells
Alter any of the options in the Format Cells or Provisional Formatting dialog boxes. If you applied conditional formatting before y'all protected the worksheet, the formatting continues to change when a user enters a value that satisfies a unlike condition.
Format columns
Utilise whatsoever of the cavalcade formatting commands, including changing column width or hiding columns (Domicile tab, Cells group, Format push button).
Format rows
Utilize any of the row formatting commands, including changing row height or hiding rows (Abode tab, Cells group, Format button).
Insert columns
Insert columns.
Insert rows
Insert rows.
Insert hyperlinks
Insert new hyperlinks, even in unlocked cells.
Delete columns
Delete columns.
Note:If Delete columns is protected and Insert columns is not protected, a user can insert columns but cannot delete them.
Delete rows
Delete rows.
Note:If Delete rows is protected and Insert rows is non protected, a user can insert rows but cannot delete them.
Sort
Use any commands to sort data (Data tab, Sort & Filter grouping).
Annotation:Users can't sort ranges that contain locked cells on a protected worksheet, regardless of this setting.
Employ AutoFilter
Utilize the drop-downwards arrows to change the filter on ranges when AutoFilters are applied.
Annotation:Users cannot use or remove AutoFilter on a protected worksheet, regardless of this setting.
Use PivotTable reports
Format, change the layout, refresh, or otherwise modify PivotTable reports, or create new reports.
Edit objects
Doing any of the following:
-
Make changes to graphic objects including maps, embedded charts, shapes, text boxes, and controls that y'all did not unlock earlier you lot protected the worksheet. For case, if a worksheet has a button that runs a macro, you can click the button to run the macro, but y'all cannot delete the push.
-
Make whatever changes, such as formatting, to an embedded chart. The nautical chart continues to be updated when you change its source data.
-
Add or edit notes.
Edit scenarios
View scenarios that you accept hidden, making changes to scenarios that you lot have prevented changes to, and deleting these scenarios. Users tin change the values in the changing cells, if the cells are not protected, and add new scenarios.
-
-
Optionally, enter a password in the Countersign to unprotect sail box and click OK. Reenter the password in the Ostend Password dialog box and click OK.
Important:
-
Use stiff passwords that combine upper-case letter and lowercase letters, numbers, and symbols. Weak passwords don't mix these elements. Passwords should be 8 or more characters in length. A passphrase that uses fourteen or more characters is improve.
-
Information technology is critical that yous call up your password. If yous forget your password, Microsoft cannot retrieve it.
-
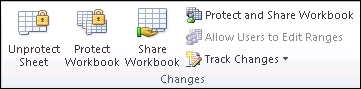
The Protect Sheet selection on the ribbon changes to Unprotect Canvas when a sheet is protected. To view this option, click the Review tab on the ribbon, and in Changes, see Unprotect Canvass.
To unprotect a sheet, follow these steps:
-
Go to the worksheet you want to unprotect.
-
Go to File > Info > Protect > Unprotect Sheet, or from the Review tab > Changes > Unprotect Sail.
-
If the sheet is protected with a password, and then enter the countersign in the Unprotect Sheet dialog box and click OK.
The following sections draw how to protect and unprotect a worksheet in Excel for the Web.
-
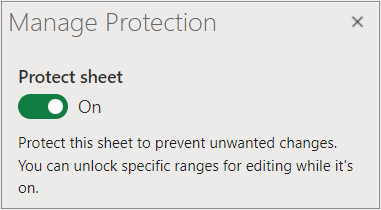
Select Review >Manage Protection.
-
To plough on protection, in the Manage Protection task pane, select Protect canvas.
Note Although you can selectively protect parts of the sheet by setting various options in the Options section, these settings only apply when the Protect sheet setting is on.
-
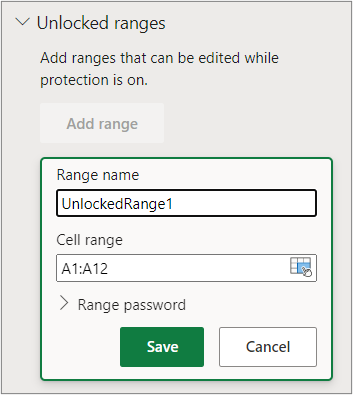
By default, the entire sail is locked and protected. To unlock specific ranges, select Unlocked ranges, and then enter a range name and cell range. You can add more than one range.
-
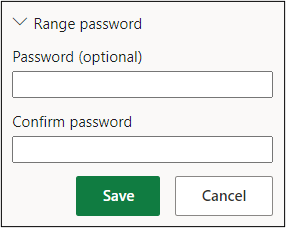
Optionally, to crave a password to edit a range, select Range password, enter and confirm the password, and so select Save. Make sure sheet protection is turned on.
-
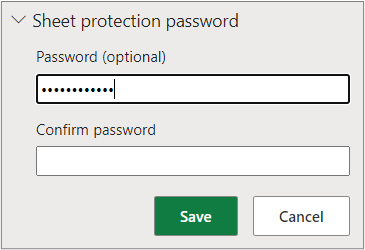
Optionally, to control the ability to edit protections for the entire sail with a password, select Sail protection password, enter and confirm the password, and then select Relieve.
Important-
Use strong passwords that combine uppercase and lowercase messages, numbers, and symbols. Weak passwords don't mix these elements. Passwords should be 8 or more characters in length. Make sure the CAPS LOCK key is off and use correct capitalization. Passwords are case-sensitive.
-
It is disquisitional that you remember your password.If you forget your password, Microsoft cannot think information technology.
-
-
Optionally, if you want to selectively enable and disable specific sheet elements, select the Options section, and then select one or more options.
Option
Allows users to
Select locked cells
Move the pointer to cells for which the Locked box is checked on the Protection tab of the Format Cells dialog box. Past default, users are allowed to select locked cells.
Select unlocked cells
Move the arrow to cells for which the Locked box is unchecked on the Protection tab of the Format Cells dialog box. Past default, users can select unlocked cells, and they can press the TAB key to move between the unlocked cells on a protected worksheet.
Format cells
Modify any of the options in the Font and Alignment groups of the Habitation tab.
Note If jail cell formatting and subconscious properties were previously protected by using the Format Cells or Conditional Formatting dialog boxes, they remain protected, but you tin only alter options in these dialog boxes by using Excel for Windows. If yous applied conditional formatting earlier y'all protected the worksheet, the formatting continues to change when a user enters a value that satisfies a different condition.
Format columns
Use any of the column formatting commands, including changing column width or hiding columns (Home tab, Cells group, Format button).
Format rows
Use any of the row formatting commands, including changing row height or hiding rows (Home tab, Cells grouping, Format button).
Insert columns
Insert columns.
Insert rows
Insert rows.
Insert hyperlinks
Insert new hyperlinks, even in unlocked cells.
Delete columns
Delete columns.
Notation:If Delete columns is protected and Insert columns is not protected, a user can insert columns just cannot delete them.
Delete rows
Delete rows.
Note:If Delete rows is protected and Insert rows is not protected, a user can insert rows only cannot delete them.
Sort
Utilize any commands to sort data (Data tab, Sort & Filter grouping).
Note:Users can't sort ranges that contain locked cells on a protected worksheet, regardless of this setting.
Utilize AutoFilter
Use the drop-down arrows to change the filter on ranges when AutoFilters are applied.
Notation:Users cannot utilize or remove AutoFilter on a protected worksheet, regardless of this setting.
Use PivotTable reports
Format, alter the layout, refresh, or otherwise modify PivotTable reports, or create new reports.
Edit objects
Doing any of the following:
-
Make changes to graphic objects including maps, embedded charts, shapes, text boxes, and controls that you did not unlock earlier you protected the worksheet. For example, if a worksheet has a button that runs a macro, you can click the push to run the macro, but you cannot delete the button.
-
Brand any changes, such every bit formatting, to an embedded chart. The nautical chart continues to be updated when you change its source data.
-
Add or edit notes.
Edit scenarios
View scenarios that yous take hidden, making changes to scenarios that y'all have prevented changes to, and deleting these scenarios. Users tin can change the values in the changing cells, if the cells are not protected, and add new scenarios.
Notes
-
If you don't want other users to run across your formulas, y'all tin hide them from existence seen in cells or the Formula bar. For more information, meet Display or hibernate formulas.
-
ActiveX controls, form controls, shapes, charts, SmartArt, Sparklines, Slicers, Timelines, and so on, are already locked when y'all add them to a spreadsheet. But the lock works simply when you enable canvass protection. For more than information, meet Protect controls and linked cells on a worksheet.
-
There are two ways to unprotect a sheet, disable it or pause it.
Disable protection
-
Select Review >Manage Protection.
-
To turn off protection, In the Manage Protection job pane, turn off Protect sheet.

Suspension protection
Pausing protection turns off protection for the current editing session while maintaining the protection for other users in the workbook. For case, you can suspension protection to edit a locked range only maintain protection for other users.
-
To break sheet protection, select Review >Suspension Protection.
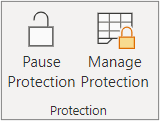
Annotation If the canvas has a protection countersign, you must enter that password to suspension protection.
-
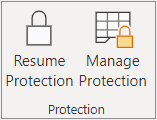
To resume sheet protection, select Review >Resume Protection.
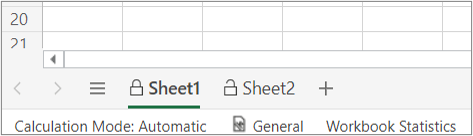
At the lesser of the sheet, the canvass tab displays a locked icon if the sheet is protected (Sheet1), and an unlocked icon if it is paused (Sheet2).
See Also
Protection and security in Excel
Protect an Excel file
Protect a workbook
Lock or unlock specific areas of a protected worksheet
Lock cells to protect them
Display or hide formulas
Protect controls and linked cells on a worksheet
Re-create and paste in a protected worksheet
Video: Password protect workbooks and worksheets (Excel 2013)
Source: https://support.microsoft.com/en-us/office/protect-a-worksheet-3179efdb-1285-4d49-a9c3-f4ca36276de6
0 Response to "The Share Workbook Button Is on the ______ Tab of the Ribbon 1 Data 2 Review 3 Edit 4 File"
Post a Comment